This is the second part in the series of building API service without the trouble of gluing stuff together.
Previously
In the last article we have created a Mify backend service for to-do app. But we used memory as a storage for to-do notes, this is for creating a quick mock-up, but for real app we would want our notes to survive restarts.
So, now we're going to add the Postgres storage.
Prerequisites
Same as in previous tutorial:
Get Mify from our GitHub: https://github.com/mify-io/mify
Install Postman or curl to test endpoints
And also install Docker Compose for running Postgres locally (in new versions of Docker, it comes bundled)
Obligatory link for the complete example before we start: https://github.com/mify-io/todo-app-example/tree/02-adding-postgres
Adding Postgres to the service
Mify CLI supports generation of boilerplate for SQL databases (Postgres for now) in a few ways:
Migrations helper using dbmate
Automatic connection creation during the service startup, config for the connection can be set via enviroment variable
Querying and database models layer generation via sqlc
To add Postgres support for the todo-backend service run this command:
$ mify add database todo-backend
Running Postgres in Docker
Before writing and applying migrations, first you need to start up instance locally. We recommend you to use Docker Compose. You can organise Compose configs for multiple services inside Mify Workspace, just put docker-compose.yaml in go-services/docker/localenv/docker-compose.yaml, here is recommended config:
version: '3'
services:
  postgres:
    image: postgres:13
    environment:
      POSTGRES_USER: user
      POSTGRES_PASSWORD: passwd
      POSTGRES_DB: todo_backend
    volumes:
      - ~/.cache/mify-db:/var/lib/postgresql/data
    ports:
      - 5432:5432
Note: Mify assumes these credentials locally, so you wouldn't have to manually set environment variable, but if you prefer different setup, just set the correct connection URI in DATABASE_URL variable. You can check the default value in generated config at go-services/internal/todo-backend/generated/postgres/config.go.
Run docker compose up inside directory with docker-compose.yaml to start the Postgres instance.
Now we can start defining our database schema.
Writing migrations
After running mify add database command you should see two new directories - go-services/migrations and go-services/sql-queries, for migrations and queries respectfully, let's begin with migrations.
We need to have a table for to-do notes, so to create a migration for adding this table, run command:
$ mify tool migrate todo-backend new todos
todos is the name of migration, you can choose any other name for convenience.
This command will create a migration in go-services/migrations/todo_backend/<date>_<migration_name>.sql. When you open this file you'll see two blocks, one for forward migration, other for rollback:
-- migrate:up

-- migrate:down
Back in the previous tutorial, we defined our todo-note model in domain layer with these fields:
type TodoNote struct {
    ID          int64
    Title       string
    Description string
    IsCompleted bool
    CreatedAt   time.Time
    UpdatedAt   time.Time
}
Now we'll translate this model to SQL table definition and write migration to create it:
 -- migrate:up

CREATE TABLE todos (
    id bigserial NOT NULL PRIMARY KEY,
    title varchar(255) NOT NULL,
    description text NOT NULL,
    is_completed boolean NOT NULL DEFAULT false,
    created_at timestamp NOT NULL DEFAULT NOW(),
    updated_at timestamp NOT NULL DEFAULT NOW()
);

-- migrate:down

DROP TABLE todos;
To apply this migration run:
$ mify tool migrate todo-backend up
You can use DataGrip or psql command to connect to the database and check if the table is created. Usually it's a good practice to check rollback migration as well, there is also a command for that - mify tool migrate todo-backend down , when migration is not as trivial as this, you can do up-down-up check by running these commands consequently.
Writing CRUD queries
As we said before Mify uses sqlc for generating database layer queries and models. This removes a lot of pain compared to writing queries without it, as it would first check SQL syntax and, because of database models, you'll have type-safe parameters for these queries. Sqlc generation is optional, you can use other libraries or ORMs for making queries, but for now this is what we have included in Mify.
So, in go-services/sql-queries/todo_backend directory, create a file queries.sql and write queries for adding, updating, selecting and deleting to-do notes:
-- name: SelectTodoNote :one
SELECT * FROM todos
WHERE id = $1 LIMIT 1;

-- name: InsertTodoNote :one
INSERT INTO todos (
  title, description
) VALUES (
  $1, $2
)
RETURNING *;

-- name: UpdateTodoNote :one
UPDATE todos
SET title = $2, description = $3,
is_completed = $4, updated_at = $5
WHERE id = $1
RETURNING *;

-- name: DeleteTodoNote :exec
DELETE FROM todos WHERE id = $1;
Then, run mify generate and you will see models and queries being generated at go-services/internal/todo-backend/generated/postgres. Now we can use these to write our storage layer.
Writing a new storage layer
TodoDBStorage Skeleton
We have defined a separate TodoStorage interface in domain layer specifically to decouple it from the Service layer, so we could replace in-memory storage later. Leveraging that, all we have to do now is to create another class TodoDBStorage in our storage layer in go-services/internal/todo-backend/storage/todo_db.go:
package storage

import (
    "errors"

    "example.com/namespace/todo-app/go-services/internal/todo-backend/domain"
    "example.com/namespace/todo-app/go-services/internal/todo-backend/generated/core"
    "example.com/namespace/todo-app/go-services/internal/todo-backend/generated/postgres"
    "github.com/jackc/pgx/v4"
    "github.com/jackc/pgx/v4/pgxpool"

)

type TodoDBStorage struct {
    pool *pgxpool.Pool
    querier *postgres.Queries
}

func NewTodoDBStorage(ctx *core.MifyServiceContext) *TodoDBStorage {
    return &TodoDBStorage{
        pool: ctx.Postgres(),
        querier: postgres.New(ctx.Postgres()),
    }
}

func (s *TodoDBStorage) InsertTodoNote(
    ctx *core.MifyRequestContext, todoNote domain.TodoNote) (domain.TodoNote, error) {
    return domain.TodoNode{}, nil
}

func (s *TodoDBStorage) SelectTodoNote(ctx *core.MifyRequestContext, id int64) (domain.TodoNote, error) {
    return domain.TodoNode{}, nil
}

func (s *TodoDBStorage) UpdateTodoNote(
    ctx *core.MifyRequestContext, todoNote domain.TodoNote) (domain.TodoNote, error) {
    return domain.TodoNode{}, nil
}

func (s *TodoDBStorage) DeleteTodoNote(ctx *core.MifyRequestContext, id int64) error {
    return nil
}
Here we pass Postgres pool from MifyServiceContext which would be created at the service startup. Before implementing actual methods, here's the helper for converting database layer model to domain one:
func makeDomainTodoNode(res postgres.Todo) domain.TodoNote {
    return domain.TodoNote{
        ID: res.ID,
        Title: res.Title,
        Description: res.Description,
        IsCompleted: res.IsCompleted,
        CreatedAt: res.CreatedAt,
        UpdatedAt: res.UpdatedAt,
    }
}
It will be used in Insert, Update, Select methods, although it's straightforward, we should avoid unnecessary code duplication, and in more complex cases there should be some conversion or transformation logic involved.
CRUD operations
Let's begin implementing operations, starting with InsertTodoNode:
func (s *TodoDBStorage) InsertTodoNote(
    ctx *core.MifyRequestContext, todoNote domain.TodoNote) (domain.TodoNote, error) {
    // Create transaction
    tx, err := s.pool.BeginTx(ctx, pgx.TxOptions{})
    if err != nil {
        return domain.TodoNote{}, err
    }
    // Don't forget to rollback in case of error
    defer tx.Rollback(ctx)
    res, err := s.querier.WithTx(tx).InsertTodoNote(ctx, postgres.InsertTodoNoteParams{
        Title: todoNote.Title,
        Description: todoNote.Description,
    })
    if err != nil {
        return domain.TodoNote{}, err
    }
    if err := tx.Commit(ctx); err != nil {
        return domain.TodoNote{}, err
    }
    return makeDomainTodoNode(res), nil
}
In this method we just need to create transaction, and call the generated InsertTodoNode function with the correct paramers. Same idea with UpdateTodoNote and DeleteTodoNote:
func (s *TodoDBStorage) UpdateTodoNote(
    ctx *core.MifyRequestContext, todoNote domain.TodoNote) (domain.TodoNote, error) {
    tx, err := s.pool.BeginTx(ctx, pgx.TxOptions{})
    if err != nil {
        return domain.TodoNote{}, err
    }
    defer tx.Rollback(ctx)
    res, err := s.querier.WithTx(tx).UpdateTodoNote(ctx, postgres.UpdateTodoNoteParams{
        ID: todoNote.ID,
        Title: todoNote.Title,
        Description: todoNote.Description,
        IsCompleted: todoNote.IsCompleted,
        UpdatedAt: todoNote.UpdatedAt,
    })
    if err != nil {
        return domain.TodoNote{}, err
    }
    if err := tx.Commit(ctx); err != nil {
        return domain.TodoNote{}, err
    }
    return makeDomainTodoNode(res), nil
}

func (s *TodoDBStorage) DeleteTodoNote(ctx *core.MifyRequestContext, id int64) error {
    tx, err := s.pool.BeginTx(ctx, pgx.TxOptions{})
    if err != nil {
        return err
    }
    defer tx.Rollback(ctx)
    if err := s.querier.WithTx(tx).DeleteTodoNote(ctx, id); err != nil {
        return err
    }
    return tx.Commit(ctx)
}
In SelectTodoNote we don't really need transaction, so it would be just a simple proxy with error handling for returning error 404:
func (s *TodoDBStorage) SelectTodoNote(ctx *core.MifyRequestContext, id int64) (domain.TodoNote, error) {
    res, err := s.querier.SelectTodoNote(ctx, id)
    // Handle that no rows can be returned, so we can correctly return 404
    // to user instead of obscure 500 error.
    if err != nil && errors.Is(err, pgx.ErrNoRows) {
        return domain.TodoNote{}, ErrTodoNoteNotFound
    }
    if err != nil {
        return domain.TodoNote{}, err
    }
    return makeDomainTodoNode(res), nil
}
Updating Service to use TodoDBStorage
Let's go back to a place, where we wire all the service dependencies - `go-services/internal/todo-backend/app/service_extra.go`. Here we just need to replace TodoMemStorage with TodoDBStorage:
func NewServiceExtra(ctx *core.MifyServiceContext) (*ServiceExtra, error) {
    dbStorage := storage.NewTodoDBStorage(ctx)
    todoService := application.NewTodoService(dbStorage)
    extra := &ServiceExtra{
        TodoService: todoService,
    }
    return extra, nil
}
Testing
Now you can run service with go run ./cmd/todo-backend and see if storage is persistent.
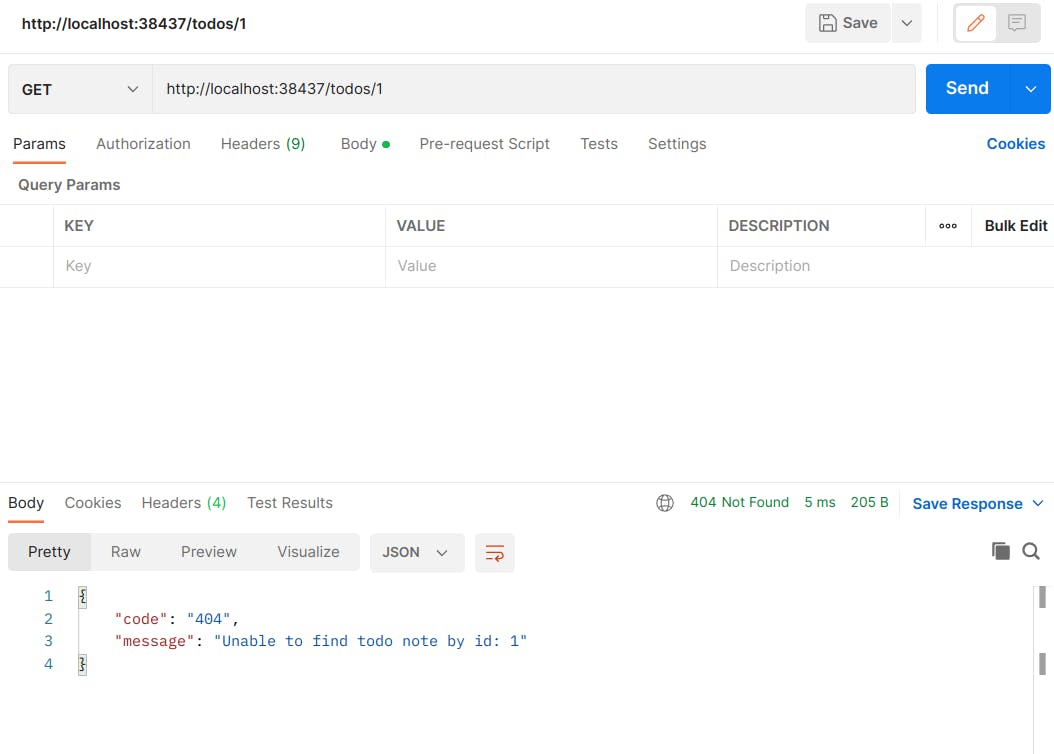
First make a GET query:

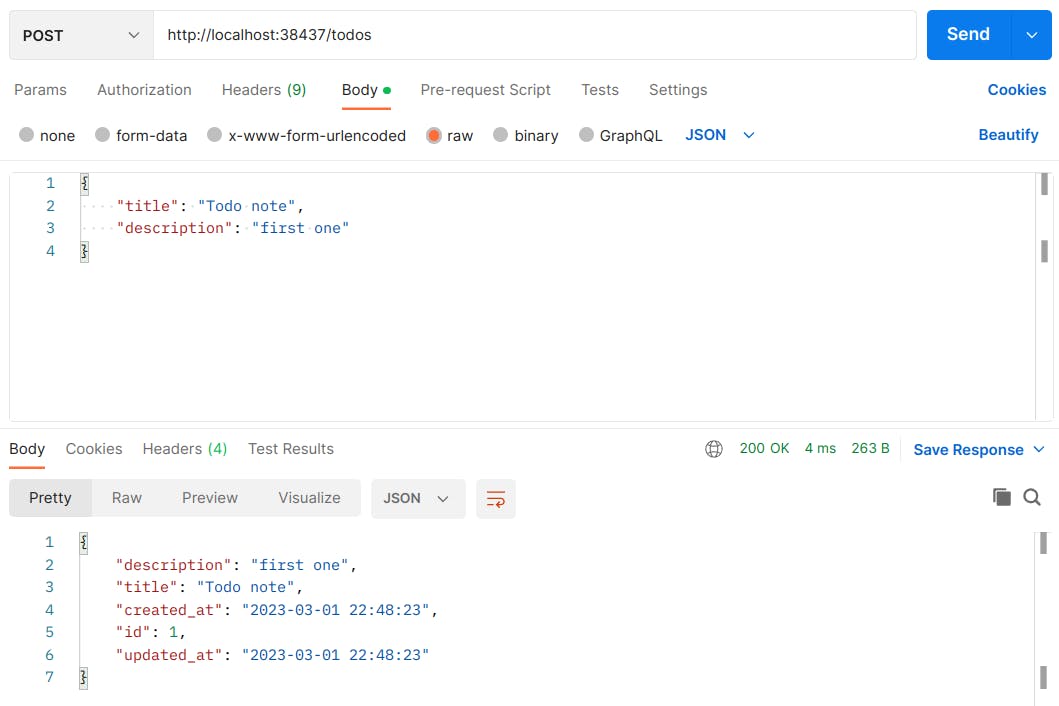
404, as expected. Then add a note with POST method:

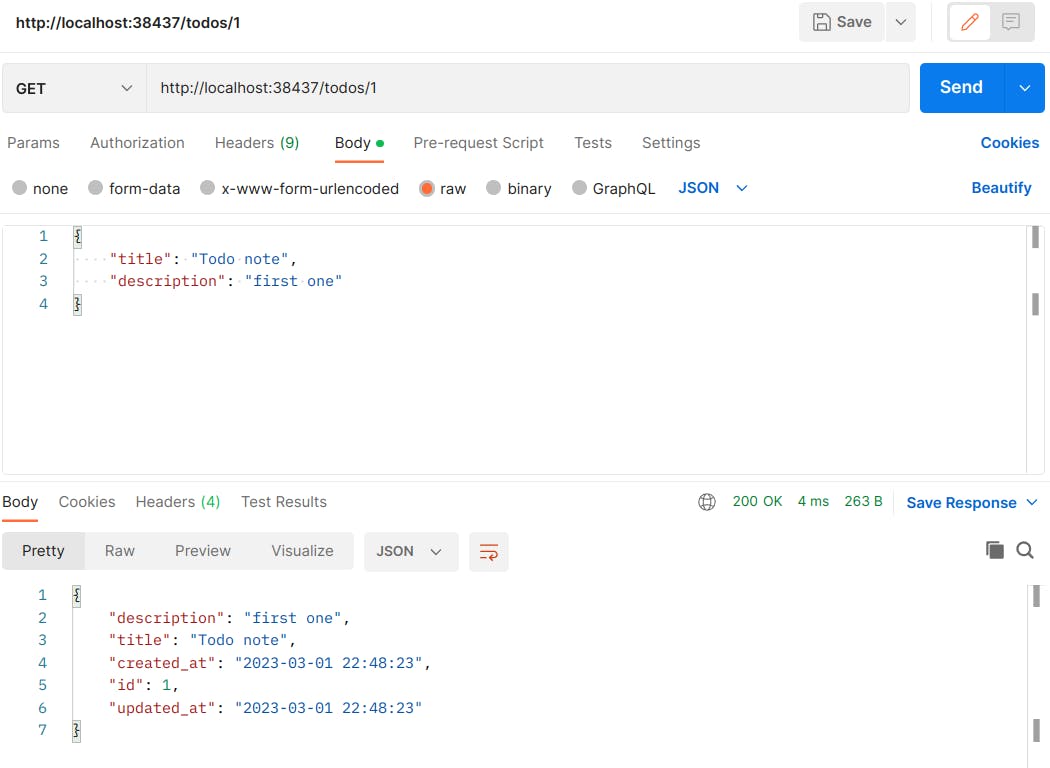
Check again:

Successfully added, now you can restart and see that it's still there or check the table in database directly.
What's next
After this tutorial this service is looking more or less ready for real-life usage, at least it can be deployed somewhere. But we can still add more to it, for instance frontend, so you wouldn't have to use postman all the time. And, naturally for a frontend we need to have some authentication.
So, until next time, we'll be back.
