Beyond API Service: Adding a React Frontend

Building a tool that helps develop cloud services - https://mify.io
Previously
In the previous tutorials, we were only focused on the backend side of the app, but calling API from Postman or curl is no fun for a to-do app, so let's move on to the frontend.
Granted, the app we'll build in this article is pretty basic, both design and functionality-wise, but this would still be a good starter from which you can later expand on your own.
Prerequisites
Assuming that you already have everything installed from the previous article for the backend, as we need to update and run it as well, here's what's needed for frontend development:
Node JS >= 18.12.1, Yarn
Get Mify from our GitHub: https://github.com/mify-io/mify
Obligatory link for the complete example: https://github.com/mify-io/todo-app-example/tree/03-react-frontend
Plan
What should a sensible to-do app have? Let's write a to-do list for that:
List of notes
Form to add a new note
Button to mark note as completed
Edit and delete note buttons
In the end, we want to get something like this:

Looking at our backend from the previous tutorials, we have an API with the basic handlers for creating, updating, and retrieving to-do notes. Huh, something is missing. Oh, right, we need to be able to list notes.
Adding List method to backend
Let's start with that, after our backend is ready then we can move to the frontend side. It's pretty easy to add it, first we need to update the OpenAPI schema at schemas/todo-backend/api/api.yaml:
  /todos:
    post:
      ...
    get:
      summary: Get list of todo notes
      responses:
        '200':
          description: OK
          content:
            application/json:
              schema:
                $ref: '#/components/schemas/TodoNoteList'
        '500':
          description: Unknown error
          content:
            application/json:
              schema:
                $ref: '#/components/schemas/Error'
components:
  schemas:
    ...
    TodoNoteList:
      type: array
      items:
        $ref: '#/components/schemas/TodoNote'
Then add a new SQL query to select all notes at go-services/sql-queries/todo_backend/queries.sql:
...
-- name: SelectTodoNotes :many
SELECT * FROM todos ORDER BY created_at DESC;
...
After that, we need to regenerate the code, so that the handler and query functions would appear:
$ mify generate
Wiring stuff together
Alright, now we need to wire the database method to the new API handler, so we need to update multiple layers: TodoDBStorage, and TodoApplication, and then implement the handler.
First, update the TodoStorage interface to add the new list method in file go-services/internal/todo-backend/domain/todo.go:
type TodoStorage interface {
    InsertTodoNote(ctx *core.MifyRequestContext, todoNote TodoNote) (TodoNote, error)
    UpdateTodoNote(ctx *core.MifyRequestContext, todoNote TodoNote) (TodoNote, error)
    SelectTodoNote(ctx *core.MifyRequestContext, id int64) (TodoNote, error)
    SelectTodoNotes(ctx *core.MifyRequestContext) ([]TodoNote, error)
    DeleteTodoNote(ctx *core.MifyRequestContext, id int64) error
}
After that, go to the go-services/internal/todo-backend/storage/todo_db.go and add implementation:
func (s *TodoDBStorage) SelectTodoNotes(ctx *core.MifyRequestContext) ([]domain.TodoNote, error) {
    res, err := s.querier.SelectTodoNotes(ctx)
    if err != nil && errors.Is(err, pgx.ErrNoRows) {
        return []domain.TodoNote{}, nil
    }
    if err != nil {
        return []domain.TodoNote{}, err
    }
    outList := make([]domain.TodoNote, 0, len(res))
    for _, dbNote := range res {
        outList = append(outList, makeDomainTodoNode(dbNote))
    }
    return outList, nil
}
And in Application layer we just need to wrap the call to this method:
go-services/internal/todo-backend/application/todo.go
func (s *TodoService) ListTodos(ctx *core.MifyRequestContext) ([]domain.TodoNote, error) {
    return s.storage.SelectTodoNotes(ctx)
}
Just a reminder, this Application layer is pretty thin in this tutorial, but in a real application you would have logic beyond the storage layer, so it's better to add it from the beginning.
Finally, moving to the handler. Right now Mify doesn't automatically add TodosGet method boilerplate, but we're planning to add that in the future, so for the time being we need to get signature of the GET handler from openapi.TodosApiServicer interface and implement it:
go-services/internal/todo-backend/handlers/todos/service.go
// TodosGet - List todo notes
func (s *TodosApiService) TodosGet(ctx *core.MifyRequestContext) (openapi.ServiceResponse, error) {
    todoSvc := apputil.GetServiceExtra(ctx.ServiceContext()).TodoService

    notes, err := todoSvc.ListTodos(ctx)
    if err != nil {
        return openapi.Response(http.StatusInternalServerError, openapi.Error{
            Code:    strconv.Itoa(http.StatusInternalServerError),
            Message: "Failed to list todo notes",
        }), err
    }

    responseList := make([]openapi.TodoNote, 0, len(notes))
    for _, note := range notes {
        responseList = append(responseList, handlers.MakeAPITodoNote(note))
    }

    return openapi.Response(http.StatusOK, responseList), nil
}
Running and testing
Alright, now we're ready to run and test the backend, make sure that Postgres is running, and start the service via go run ./cmd/todo-backend.
Using curl and port from the service startup logs we can test the new handler:
$ curl -s 'http://localhost:38437/todos' | jq .
[
  {
    "description": "second description",
    "title": "second",
    "created_at": "2023-04-02 23:48:09",
    "id": 7,
    "updated_at": "2023-04-03 02:31:14"
  },
  {
    "description": "first desc",
    "title": "first",
    "created_at": "2023-04-02 23:48:01",
    "id": 6,
    "updated_at": "2023-04-03 01:22:50"
  }
]
Building Frontend
Now after we have a prepared backend with the complete API, let's just move to the frontend already! Adding it to the Mify Workspace shouldn't be a surprise at this point, it's the simple command:
$ mify add frontend --template react-ts todo-app
Although there is an extra one, we need to wire it to the backend:
$ mify add client todo-app --to todo-backend
Now the frontend is ready for implementation, last command will add a client with all generated classes and methods, so from the frontend perspective calling todo-backend would be no different from a local call. Here's the structure that was generated by Mify:
js-services
├── package.json
├── todo-app
│   ├── Dockerfile
│   ├── package.json
│   ├── public
│   │   ├── index.html
│   │   ├── manifest.json
│   │   └── robots.txt
│   ├── src
│   │   ├── app
│   │   │   ├── hooks.ts
│   │   │   └── store.ts
│   │   ├── App.css
│   │   ├── App.test.tsx
│   │   ├── App.tsx
│   |   ├── generated
│   │   │   ├── api
│   │   │   │   └── clients
│   │   │   │       └── todo-backend
│   │   │   │           ├── ApiClient.js
│   │   │   │           ├── handlers
│   │   │   │           │   └── Api.js
│   │   │   │           ├── index.js
│   │   │   │           ├── models
│   │   │   │           │   ├── Error.js
│   │   │   │           │   ├── TodoNoteAllOf.js
│   │   │   │           │   ├── TodoNoteCreateRequest.js
│   │   │   │           │   ├── TodoNote.js
│   │   │   │           │   ├── TodoNoteUpdateRequestAllOf.js
│   │   │   │           │   └── TodoNoteUpdateRequest.js
│   │   │   │           └── package.json
│   │   └── core
│   │       ├── clients.js
│   │       ├── context.js
│   │       └── state.ts
│   │   ├── index.css
│   │   ├── index.tsx
│   │   ├── react-app-env.d.ts
│   │   ├── reportWebVitals.ts
│   │   └── setupTests.ts
│   └── tsconfig.json
└── yarn.lock
Essentially that's a simple React+Redux template with additional generated code for calling backend service.
Libraries
Before starting to write code, let's install some libraries that would help to write less of it:
yarn add styled-components- This allows defining styles as components in React instead of CSS, leveraging the type system in Typescript.yarn add react-hook-form- A quite elegant library for wiring forms without hassle.yarn add moment- Just format the date to display something like "a few hours ago" instead of the dry ISO format.
Creating components
Before even adding the logic to call backend let's first create a mockup UI. This way you can freely experiment with design before having to debug some interaction issues.
To start the frontend app first install all the missing libraries with yarn install and then run yarn start and the app should be available at http://localhost:3000. The default template should be an almost blank page suggesting you to edit src/App.tsx.
Let's start with the CSS, in this tutorial we wouldn't use separate CSS files, instead we'll define styled blocks using the styled-components library.
We would still need to define global styles like the font size and family, CSS reset to remove all unnecessary margins, so let's put it in js-services/todo-app/src/index.css:
* {
  margin: 0;
  padding: 0;
  box-sizing: border-box;
}

body {
  margin: 0;
  font-family: -apple-system, BlinkMacSystemFont, 'Segoe UI', 'Roboto', 'Oxygen',
    'Ubuntu', 'Cantarell', 'Fira Sans', 'Droid Sans', 'Helvetica Neue',
    sans-serif;
  -webkit-font-smoothing: antialiased;
  -moz-osx-font-smoothing: grayscale;

  text-align: center;
  background-color: #282c34;
  color: white;
  font-size: 18px;
}

code {
  font-family: source-code-pro, Menlo, Monaco, Consolas, 'Courier New',
    monospace;
}
Also remove js-services/todo-app/src/App.css as we wouldn't need it.
Notes list
We'll split the mockup in a few milestones, just to be able to see what would we get in between. First we're going to make some simple list like this:

For a single note entry define component EntryItem in js-services/todo-app/src/components/EntryItem.tsx:
import styled from "styled-components";

const EntryItem = styled.div`
    background-color: #17191e;
    text-align: left;
    padding: 10px;
    margin: 10px;
    border-radius: 2px;
`;
export default EntryItem
In js-services/todo-app/src/App.tsx, remove most of the stuff that was generated initially and use this EntryItem to make a list:
import styled from 'styled-components';
import EntryItem from './components/EntryItem';

function App() {
    return (
        <div className="App">
            <Container>
                <h1>Mify To-Do List</h1>

                <EntryItem>
                    todo1
                </EntryItem>
                <EntryItem>
                    todo2
                </EntryItem>
                <EntryItem>
                    todo3
                </EntryItem>
            </Container>
        </div>
    );
}

const Container = styled.div`
  position: relative;
  max-width: 800px;
  width: 100%;
  margin: 0 auto;
  margin-top: 30px;
  padding: 0 2rem;
`;

export default App;
Adding new note form

The form would be a more complex component, but using react-hook-form will simplify things for us, here the code for the form, put it in the src/components/TodoNoteForm.tsx:
import {useForm} from 'react-hook-form';
import TodoNote from '../generated/api/clients/todo-backend/models/TodoNote';
import styled from 'styled-components';
import Button from './Button';

type FormValues = {
    title: string;
    description: string;
    serverError: string;
};

interface TodoNoteFormProps {
    note?: TodoNote;
}

export default function TodoNoteForm(props: TodoNoteFormProps) {
    let defaultValues = {}
    if (props.note) {
        defaultValues = {
            title: props.note.title,
            description: props.note.description,
        }
    }

    const {register, handleSubmit, setError, formState: {errors}} = useForm<FormValues>({
        defaultValues: defaultValues,
    });

    async function onSubmit(data: FormValues) {
    }

    return (
        <form onSubmit={handleSubmit(onSubmit)}>
            <div>{errors.serverError && errors.serverError.message}</div>
            <TitleInput placeholder="Title" type="text" {...register("title")} />
            <DescriptionInput
                placeholder="What to do you want to do today?"
                {...register("description")}
            />
            <Button type="submit">{props.note ? "Update" : "Add"} note</Button>
        </form>
    );
}

const TitleInput = styled.input`
    display: block;
    font-size: 18px;
    background-color: #282c34;
    color: white;
    border: none;
    border-radius: 2px;
    padding: 5px;
    margin-top: 10px;
    width: 100%;
`;

const DescriptionInput = styled.textarea`
    display: block;
    background-color: #282c34;
    color: white;
    border: none;
    border-radius: 2px;
    padding: 5px;
    margin-top: 10px;
    min-height: 100px;
    width: 100%;
`;
react-hook-form allows us to connect form values to inputs via the simple register function call. Also as you can see we're passing note as a property for the form, so that later on we can reuse this form for updating existing notes.
Now, add this form to App.tsx:
...
    return (
        <div className="App">
            <Container>
                <h1>Mify To-Do List</h1>

                <EntryItem>
                    <TodoNoteForm />
                </EntryItem>
                <EntryItem>
                    todo1
                </EntryItem>
                <EntryItem>
                    todo2
                </EntryItem>
                <EntryItem>
                    todo3
                </EntryItem>
            </Container>
        </div>
    );
Creating TodoNoteEntry
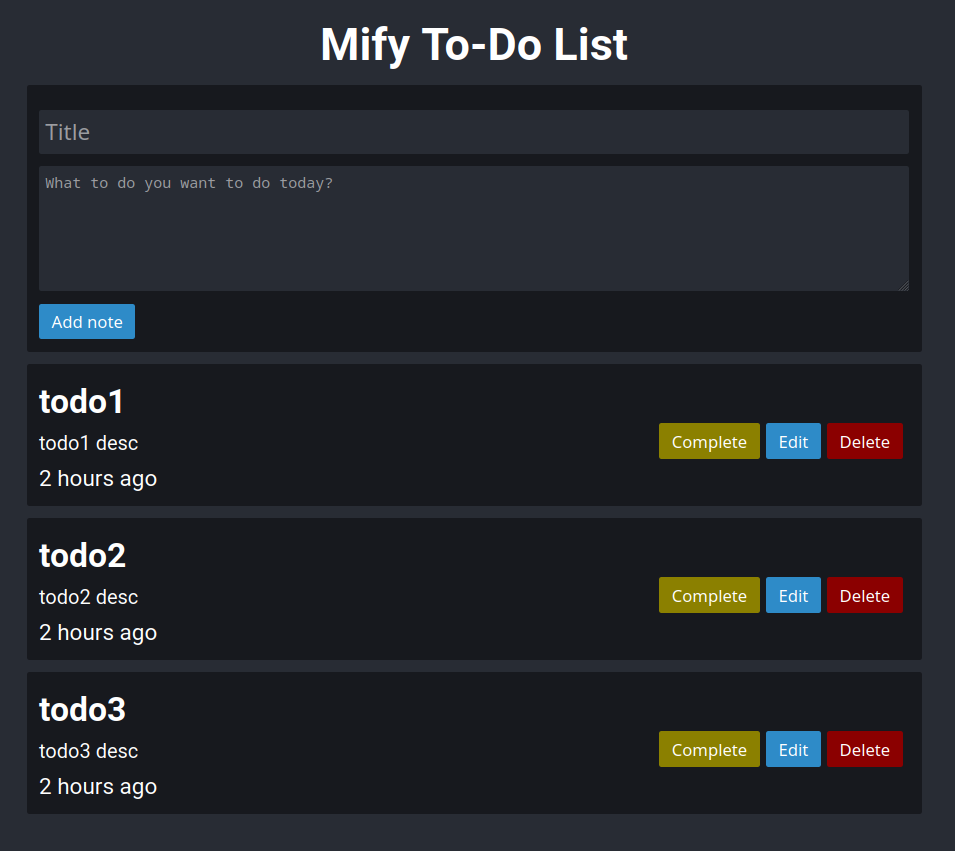
Now that's looks really close to the final version. Here's the code for src/components/TodoNoteEntry.tsx:
import {useState} from 'react';
import styled from 'styled-components';
import TodoNote from '../generated/api/clients/todo-backend/models/TodoNote';
import EntryItem from './EntryItem';
import Button from './Button';
import moment from 'moment';

export interface TodoNoteEntryProps {
    content: TodoNote;
}

export default function TodoNoteEntry(props: TodoNoteEntryProps) {
    var [isCompleted, setCompleted] = useState(false);
    const note = props.content

    return (
        <EntryItem>
            <EntryData>
                <Content>
                    <Title>{note.title}</Title>
                    <Description>{note.description}</Description>
                    <Date>{moment(note.updated_at).fromNow()}</Date>
                </Content>
                <Buttons>
                    <CompleteButton
                        isCompleted={isCompleted}
                        onClick={() => {
                            setCompleted(!isCompleted)
                        }}
                        >
                        {isCompleted ? "Uncomplete" : "Complete"}
                    </CompleteButton>
                    <Button>Edit</Button>
                    <DeleteButton>Delete</DeleteButton>
                </Buttons>
            </EntryData>
        </EntryItem>)

}

const EntryData = styled.div`
    display: flex;
`;

const Content = styled.div`
    flex: 1;
`;

const Title = styled.h2``;

const Description = styled.div`
    font-size: 16px;
    margin: 5px 0px;
`;

const Date = styled.div``;

const Buttons = styled.div`
    display: flex;
    flex-direction: row;
    align-items: center;
    justify-content: center;

    button {
        margin-right: 5px;
    }
`;

interface CompleteButtonProps {
    isCompleted: boolean;
}

const CompleteButton = styled(Button)<CompleteButtonProps>`
    background-color: #${props => props.isCompleted ? "006400" : "8b8000"};
`;

const DeleteButton = styled(Button)`
    background-color: #8b0000;
`;
Here in some cases styled-components were used just to create a separate type for the block, but that's not the case for the CompleteButton, it would change color to green when you click it, that is a really powerful feature of this library. Let's also update the list in App.tsx:
    let note1 = new TodoNote("todo1", "2023-04-05", 1, "2023-04-05")
    note1.description = "todo1 desc"
    let note2 = new TodoNote("todo2", "2023-04-05", 1, "2023-04-05")
    note2.description = "todo2 desc"
    let note3 = new TodoNote("todo3", "2023-04-05", 1, "2023-04-05")
    note3.description = "todo3 desc"
    return (
        <div className="App">
            <Container>
                <h1>Mify To-Do List</h1>

                <EntryItem>
                    <TodoNoteForm />
                </EntryItem>
                <TodoNoteEntry content={note1} />
                <TodoNoteEntry content={note2} />
                <TodoNoteEntry content={note3} />
            </Container>
        </div>
    );
We're using the generated TodoNote class to pass the note data for simplicity.
Adding edit support for a note
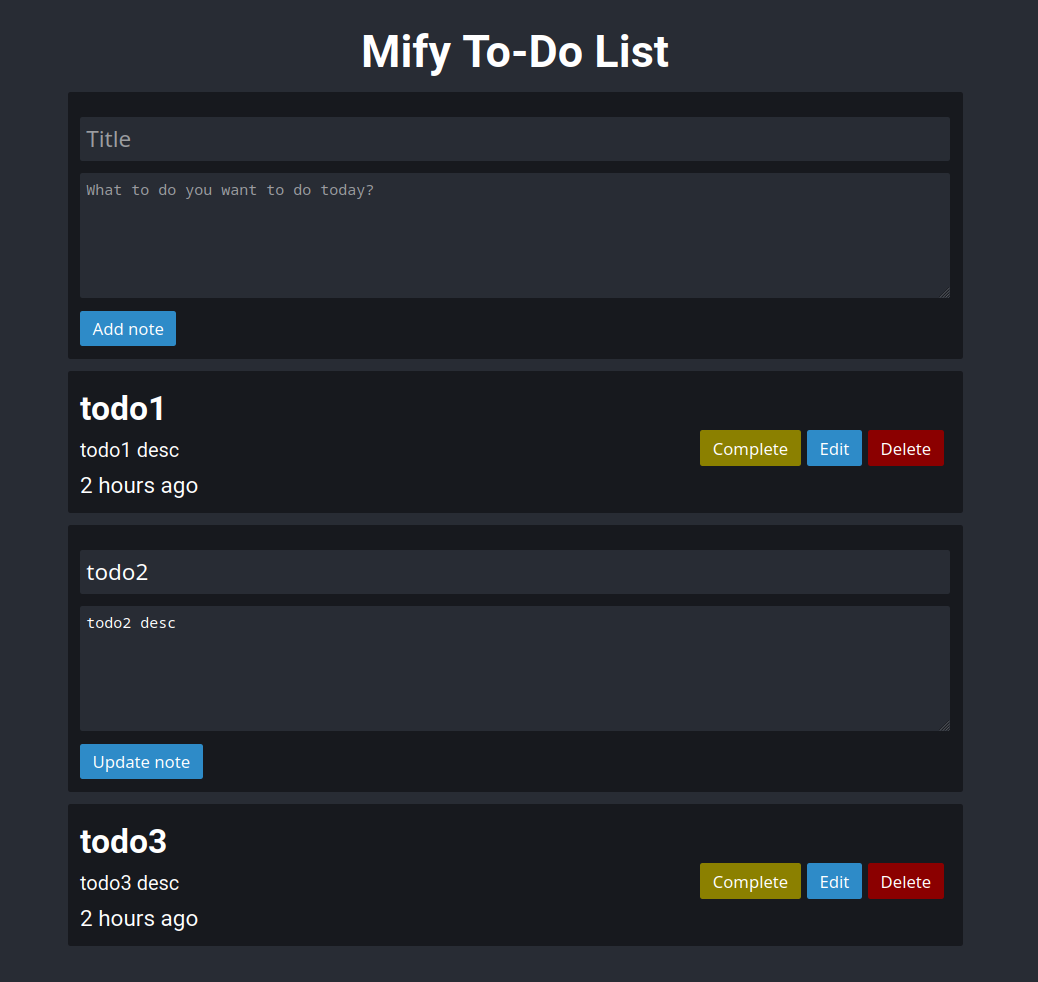
Now we want to replace the TodoNoteEntry content with the form when we click the Edit button. Here's the update component code:
export default function TodoNoteEntry(props: TodoNoteEntryProps) {
    var [isEdit, setEdit] = useState(false);
    var [isCompleted, setCompleted] = useState(false);
    const note = props.content
    const updateList = () => {
        setEdit(false);
    }

    return (
        <EntryItem>
            {!isEdit && <EntryData>
                <Content>
                    <Title>{note.title}</Title>
                    <Description>{note.description}</Description>
                    <Date>{moment(note.updated_at).fromNow()}</Date>
                </Content>
                <Buttons>
                    <CompleteButton
                        isCompleted={isCompleted}
                        onClick={() => {
                            setCompleted(!isCompleted)
                        }}
                        >
                        {isCompleted ? "Uncomplete" : "Complete"}
                    </CompleteButton>
                    <Button onClick={() => setEdit(true)}>Edit</Button>
                    <DeleteButton>Delete</DeleteButton>
                </Buttons>
            </EntryData>}
            {isEdit && <TodoNoteForm note={note} updateList={updateList} />}
        </EntryItem>)

}
We're added isEdit state variable which is toggled by Edit button. But how can we close the form after the editing is finished? In React you can't just modify any arbitrary component, all the state changes are propagated from root to the child component. This means we need to add a callback updateList which will update isEdit state variable and close the form. Here are the changes you need to do to add this parameter to the TodoNoteForm:
interface TodoNoteFormProps {
    note?: TodoNote;
    updateList: UpdateListFunc
}
...
export default function TodoNoteForm(props: TodoNoteFormProps) {
...
    async function onSubmit(data: FormValues) {
        props.updateList()
    }
...
}
Also add an empty updateList callback on the main App.tsx page:
<EntryItem>
   <TodoNoteForm updateList={() => {}} />
</EntryItem>
If you run the app right now, you should see TodoNoteEntry showing the form when you click the Edit button. It looks like everything is ready for adding calls to backend.
Adding backend calls
Note: Make sure that your todo-backend is running somewhere, otherwise you won't be able to test it.
First let's use the list method we implemented in this tutorial, update App.tsx with the following things:
...
import {useEffect, useState} from 'react';
import {useAppSelector} from './app/hooks';
import Context from './generated/core/context';
...

function App() {
    var [notes, setNotes] = useState([]);
    var ctx = useAppSelector((rootState) => rootState.mifyState.value)
    const updateList = async (ctx: Context) => {
        setNotes(await ctx.clients.todoBackend().todosGet())
    }
    useEffect(() => {updateList(ctx)}, [ctx])
    return (
        <div className="App">
            <Container>
                <h1>Mify To-Do List</h1>

                <EntryItem>
                    <TodoNoteForm updateList={() => {}} />
                </EntryItem>
                {notes.map((note: TodoNote, idx) => <TodoNoteEntry key={idx} content={note} />)}
            </Container>
        </div>
    );
}
Mify generated a Context class with the list of clients inside the default Redux state. To make a request to the backend service you just need to call await ctx.clients.todoBackend().todosGet() and it will automatically route it to the locally running service.
Next, make the TodoNoteForm call add and update handlers when the form is submitted:
import {useForm} from 'react-hook-form';
import {useAppSelector} from '../app/hooks';
import Context from '../generated/core/context';
import TodoNote from '../generated/api/clients/todo-backend/models/TodoNote';
import TodoNoteCreateRequest from '../generated/api/clients/todo-backend/models/TodoNoteCreateRequest';
import TodoNoteUpdateRequest from '../generated/api/clients/todo-backend/models/TodoNoteUpdateRequest';
...

export type UpdateListFunc = (ctx: Context) => void;
...
export default function TodoNoteForm(props: TodoNoteFormProps) {
    var ctx = useAppSelector((rootState) => rootState.mifyState.value)
...
    async function onSubmit(data: FormValues) {
        if (props.note) {
            let req = TodoNoteUpdateRequest.constructFromObject(data, null);
            req.is_completed = props.note.is_completed;
            await ctx.clients.todoBackend().todosIdPut(props.note.id, req)
                .catch(_ => setError('serverError',
                    {type: "server", message: "Failed to update note"}))
            props.updateList(ctx)
            return;
        }
        const req = TodoNoteCreateRequest.constructFromObject(data, null);
        await ctx.clients.todoBackend().todosPost(req)
            .catch(_ => setError('serverError',
                {type: "server", message: "Failed to add note"}))
        props.updateList(ctx)
    }
...
}
Also we need to pass updateList to the form from App.tsx:
<TodoNoteForm updateList={updateList} />
Even though it's unoptimal, we call the updateList callback on every change, but for the simplicity and reliability it would be better like than, otherwise half of this tutorial will be about supporting the state of the to-do notes list.
Finally, implement CompleteButton and DeleteButton in TodoNoteEntry:
export interface TodoNoteEntryProps {
    content: TodoNote;
    updateList: UpdateListFunc
}

export default function TodoNoteEntry(props: TodoNoteEntryProps) {
    var [isEdit, setEdit] = useState(false);
    const note = props.content
    const updateList = (ctx: Context) => {
        props.updateList(ctx);
        setEdit(false);
    }

    var ctx = useAppSelector((rootState) => rootState.mifyState.value)
    const deleteNote = async () => {
        await ctx.clients.todoBackend().todosIdDelete(note.id)
            .catch(_ => alert("Failed to delete note"))
        props.updateList(ctx);
    }

    const toggleCompleteNote = async () => {
        const req = new TodoNoteUpdateRequest(note.title)
        req.description = note.description
        req.is_completed = !note.is_completed

        await ctx.clients.todoBackend().todosIdPut(note.id, req)
            .catch(_ => alert("Failed to delete note"))
        props.updateList(ctx);
    }
...
                <Buttons>
                    <CompleteButton
                        isCompleted={note.is_completed}
                        onClick={toggleCompleteNote}>
                        {note.is_completed ? "Uncomplete" : "Complete"}
                    </CompleteButton>
                    <Button onClick={() => setEdit(true)}>Edit</Button>
                    <DeleteButton onClick={deleteNote}>Delete</DeleteButton>
                </Buttons>
...
And since we're calling updateList in here as well, pass it from the App.tsx:
{notes.map((note: TodoNote, idx) => <TodoNoteEntry key={idx} content={note} updateList={updateList}/>)}
Great, everything should be implemented now. Check your backend service log to see how the frontend app makes requests.
What's next
With this tutorial we have a basic end-to-end cloud application ready for deployment. From here we can add stuff, which actually makes writing apps a complex task:
Authentication
Static and dynamic configuration for multiple environments
Feature flags or how to deploy without breaking things (or only if you want it)
Write in comments what would you want to learn more about and we'll be back with it next time.


